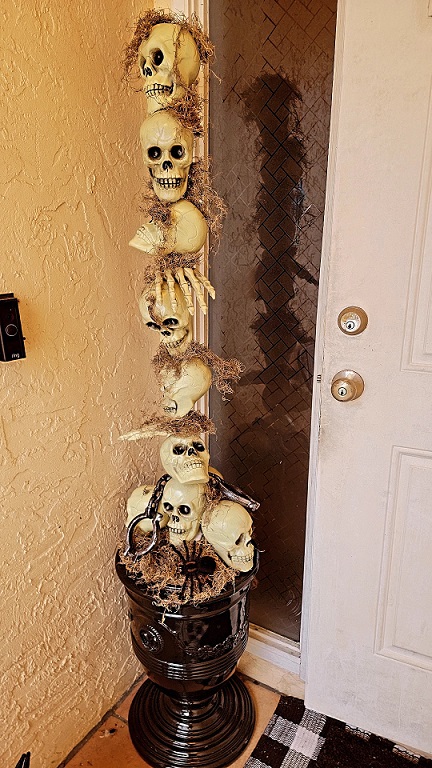

If there is one thing everyone knows about me, it’s that I LOVE HALLOWEEN. It is my favorite holiday (sorry Christmas you’re second) and when August is nearing its end, Adam already knows it’s time to head to the attic because it’s Halloween time (thanks, boo)! Now I don’t NEED any more décor (said no woman ever), BUT I love DIYs, and we love creating something fun. I believe this skull tower cost me $15 (at most) total and was so easy to build. I found all items at the dollar store, which was great, and I need to thank my Dil pickle for climbing the isle for the skull heads (LOL). The only other items I used were the glue gun I already had and the pot I used. For this, you can use a regular outdoor pot like this one, but I decided to use a tree stand we had in the garage.

Materials
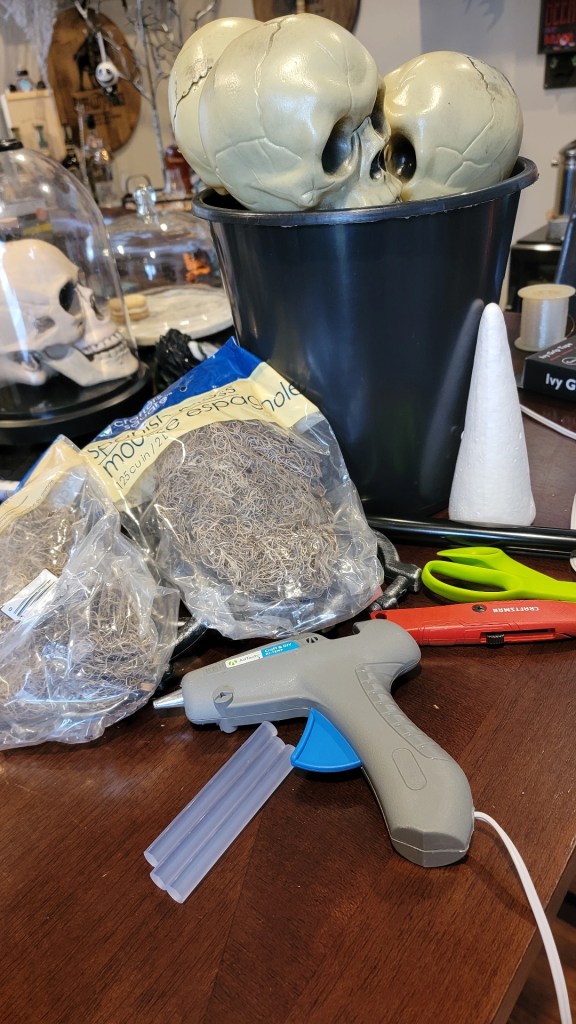
- skulls found at the dollar store (it depends on how tall you want your tower, I used 10).
- Skull hands if you want to incorporate them instead of just having heads (again, amount counts on how tall your tower will be)
- 1 broomstick, just the stick (plastic or wood)
- Foam balls (Large)
- outdoor pot of your choice
- a couple of bags of moss (found at the dollar store as well)
- Glue gun
- Glue
- Scissors
- extra accessories you may have for Halloween you want to add (i.e., spider, crows, snake)
Building Instructions
- Grab your pot and glue a large foam ball to the bottom of it.
- Grab the rest of your foam and use it as filler foam around the ball to ensure it is not too shaky.
- Take your broomstick and poke it through the middle of your foam ball
- Grab your skull heads and hands (if using hands) and cut holes on the bottom and top of them (it doesn’t have to be perfect at ALL). Make sure you don’t do each skull or hand hole on the same spot. This way, it will create a different look sitting on the tower.
- Once you have stacked the heads or hands to the top, grab your moss and begin gluing it between the skull parts and the broomstick to cover any gaps or spaces where you can see the pole or any imperfections. Again, it does not have to be perfect. Some spots can have more moss than others.
- Add your extra Halloween accessories such as a crow, spider, snake, etc.
- Voila, enjoy!
I would buy some extra skulls just in case when beginning to make holes, some might get damaged. Also, I’ve seen others use dowels instead of a broomstick, so that might be an option as well. If you want to change it up a bit, you can also spray paint the skulls! I did this for a few I had inside the home, and it was easy peasy! Most importantly, have fun with it!
Remember to tag me on IG so that I can feature you on my page!
Did you try this DIY? Rate it below and leave a comment. I’d love to hear your feedback.


