Purple Perfection: An Ube Pancake Recipe

Today, I’m excited to share with you the delightful world of ube pancakes. I first discovered these vibrant and delicious pancakes during my internship year in Washington, D.C., at a charming spot called Purple Patch. Their unique flavor and stunning purple hue instantly captivated me, and they’ve been a beloved staple in my kitchen ever since.

Ube pancakes quickly became our Sunday breakfast go-to treat, and it wasn’t long before my whole family started requesting them. Inspired by the flavors and memories from my time in D.C., I decided to create my own version of ube pancakes. After numerous trials and tweaks, I finally perfected a recipe that has become a hit with everyone who tries it.

So what exactly is ube? Ube, also known as purple yam, is a tuberous root vegetable native to the Philippines. It is renowned for its vibrant purple color and sweet, nutty flavor. Ube is commonly used in Filipino cuisine, especially in desserts and sweet treats. It is often found in dishes like ube halaya (a sweet jam), ube ice cream and various baked goods.

The distinctive color and taste of ube make it a popular ingredient for adding a unique twist to traditional recipes, such as pancakes, cakes, and pastries. Its eye-catching hue and delightful flavor have helped it gain popularity in many parts of the world, far beyond its origins in the Philippines.

Join me as I share my journey, the recipe, and tips on making these delectable ube pancakes that are sure to brighten your breakfast table.

Ube deliciousness

Ingredients

  • 2 cups of pancake mix (I use this one)
  • 1 1/2 cups milk
  • 1 tsp ube extract (I use this one)
  • 1/4 cup of ube hayala (I use this one)
  • 4 tbsp of butter
  • Syrup to top pancake
  • Powdered sugar (optional)

Instructions

  1. Prepare your batter by mixing the pancake mix with milk.
  2. Add in the ube extract and halaya. Mix until the clumps are gone.
  3. Grab a skillet pan, add 1 tablespoon of butter, and set to medium heat.
  4. Once the butter has melted, add in the batter (this depends on how large you want your pancake). I usually use 1/4 batter at a time.
  5. After roughly 2 1/2 minutes, and you see the bubbles formed on top of the pancake, flip your pancake and cook for about another 2 minutes.
  6. Continue previous steps until all batter is used.
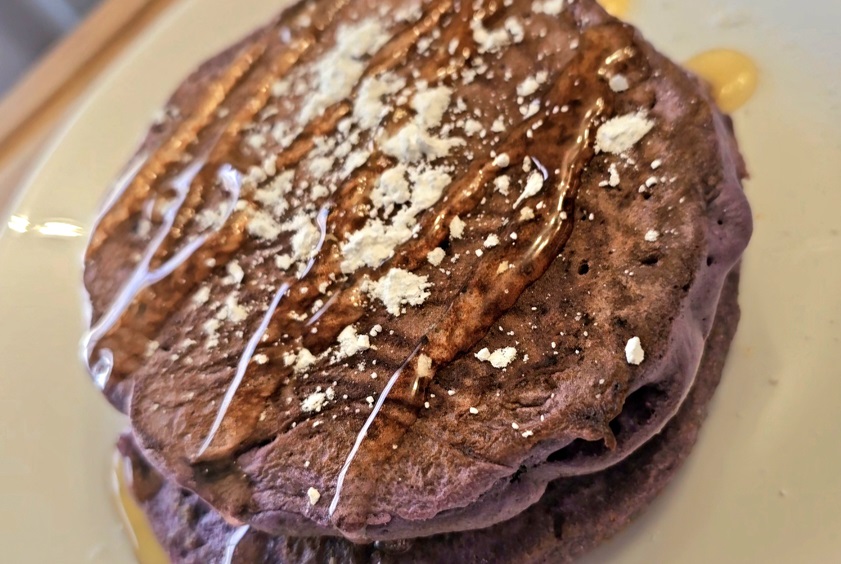
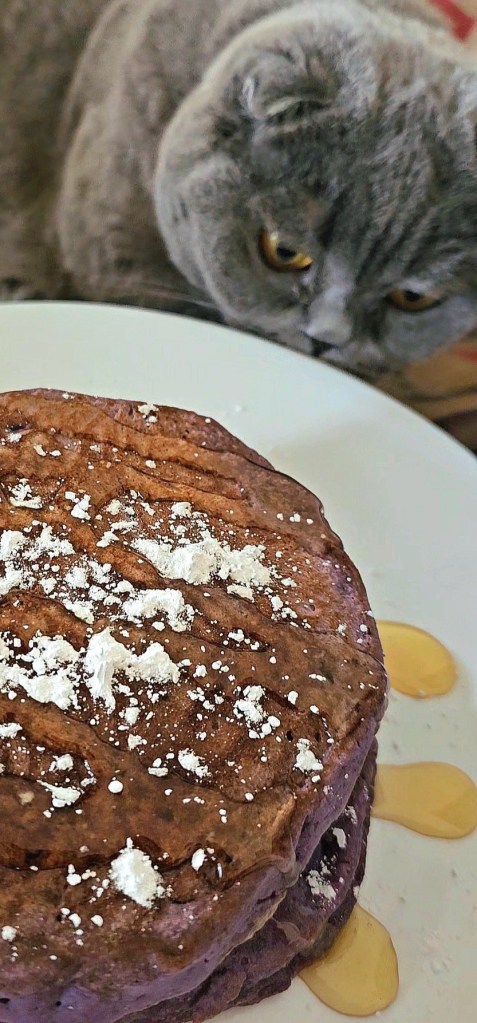
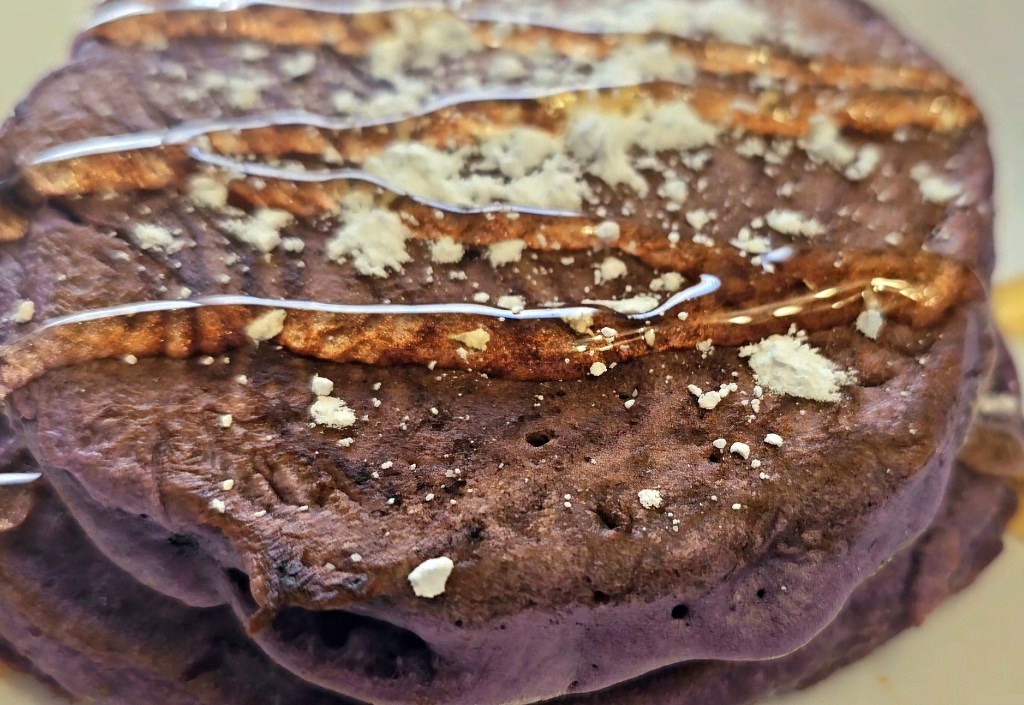
  7. Remove from heat and top with some powdered sugar (optional) and syrup.
  8. Enjoy!
Here is a video showing all the steps!

Note: This recipe makes 4 large pancakes or 8 small ones. This all depends on how big you want them to be. Also, I like topping these pancakes with fruit (strawberries, blueberries, etc) and honey, so feel free to get creative with it!

Did you try this recipe? Rate it below and leave a comment. I’d love to hear your feedback.

View Posts

Go back

Your message has been sent

Rating

Warning
Warning.

Homemade Cowboy Candy: Sweet and Spicy Delight

If there’s one thing that can transform a meal from ordinary to extraordinary, it’s the perfect blend of flavors. Enter cowboy candy: a delightful concoction that balances sweet and spicy in the most irresistible way. As someone who loves to experiment with taste sensations, I find that cowboy candy adds a unique twist to just about any dish. Whether I’m topping off a burger, spicing up a sandwich, or simply enjoying it straight from the jar, the sweet heat of cowboy candy never fails to captivate my taste buds.

The magic lies in its simplicity—fresh jalapeƱos are simmered in a sugary syrup until they reach a candied perfection, creating a mouthwatering treat that’s both fiery and sweet. This versatile condiment not only enhances flavors but also brings a touch of homemade charm to my kitchen creations. Join me as I share this beloved recipe, and let’s explore the delightful dance of sweetness and spice that cowboy candy brings to the table. Yee-haw!

JalapeƱos in the jars prior to placing in the refrigerator.

Ingredients

  • 3 lbs of jalapeƱos
  • 2 cups of apple cider vinegar (I use this one)
  • 4 cups of granulated sugar (if you prefer it them to be more sweet than spicy, feel free to add 1 additional cup of sugar)
  • 1 tbsp garlic powder
  • 1 tbsp fresh ginger
  • 1 tsp celery seed
  • a couple of whole cloves
    • You will also need some mason jars or other containers that can be sealed.

Instructions

  1. Slice your jalapeƱos (about 1/4″ thick).
  2. Add all additional ingredients into a large stock pot, stir, and set the heat to high until it begins to boil. Once it begins to boil, lower to heat to medium-low and let it simmer for 6 minutes.
  3. After 6 minutes have elapsed, set the heat to high again until it begins to boil. Once it begins to boil, add in the sliced jalapeƱos. You will notice the syrup will stop boiling once you add in the jalapeƱos, so just leave the heat as is until it starts boiling again.
  4. Once it is boiling with the jalapeƱos, lower the heat to medium-low, and simmer for 6 minutes. During this time, you will notice the jalapeƱos will begin to brown. This is what we want.
  5. Once the 6 minutes have elapsed, use a slotted spoon to scoop out the jalapeƱos and add them into your mason jars or any other containers that can be sealed.
  6. Once all the jalapeƱos are removed and the liquid is all that is left in the pot, raise the heat once again so that it begins to boil. Let this boil for 6 minutes.
  7. Once the 6 minutes are up, turn off the stove, remove the pot from the heat, and use a ladle to fill up the jars with the syrup. Leave about 1/4″ at the top without liquid.
  8. Seal the jars and place in the refrigerator for minimum of 2 weeks, but preferably 3 weeks before using them. This is for optimum results!
  9. Enjoy!
@fine.and.pandy

make cowboy 🤠 candy šŸ¬ w/ us šŸ’š full recipe ā¬‡ļø https://hookedonfood.blog/2024/06/23/cowboy-candy/ • #cowboy #candy #jalapeno #recipe #recipes

♬ Cooking Time – ZydSounds
Here is a video for reference of the steps I took while making this!

Note: You may want to use gloves when chopping the jalapeƱos in case you believe any of the oils will irritate your skin. Please be careful when using the ladle to fill the jars. The syrup is extremely hot and can cause a bad burn. Also, do not open the jars before the 2-week mark. We want to leave these as undisturbed as possible for the best results. Oh, this recipe stays fresh for up to 3 months when refrigerated, though I doubt they’ll last that long—at least they don’t in my home!

Did you try this recipe? Rate it below and leave a comment. I’d love to hear your feedback.

View Posts

Go back

Your message has been sent

Rating

Warning
Warning.

Mima’s Sweet Bread

Deliciousness

So you know how most people picked up a new hobby during quarantine? Well, mine was bread making and now, let’s just say I want to make ALL the bread. Sure there were some not-so-great breads in the beginning, but then there were some like the one making all the trial and errors worth it. This was created after reading a bunch of sweet bread recipes, but not really wanting a bread that was too sweet, so I had to figure out how to make this bread with a touch of sweetness that was not too over-powering. I named this the Mima bread because my Mima (grandmother) loves her some condensed milk, and she LOVES this bread. As a matter a fact, she requests it every time I visit. This dough is super simple to make, and if you have an electric mixer, your work is basically cut out for you. The longest part of this recipe is the proofing and waiting for the bread to rise, but I promise you, it’ll all be worth it. The layering of the dough to shape the bread may sound intimidating, but don’t let it scare you. Yah, it’ll be messy because of the filling, and that’s okay; it’ll turn out fine. The hardest part of this recipe is waiting for the bread to cool down before you can take a bite!

fresh out of the oven

Dough Ingredients

  • 1 1/2 cup all-purpose flour
  • 2 tbsp softened butter
  • 2/3 cup warm milk (between 105-115 F)
  • 1 tsp active dry yeast; I use this one
  • 1/2 tsp kosher salt
  • 1 1/2 tbsp sweetened condensed milk; I use the Magnolia brand
  • 2 tbsp granulated sugar

Condensed Filling Ingredients

  • 2 tbsp sweetened condensed milk
  • 3 tbsp softened butter

Instructions

  1. In a large mixing bowl (or your electric mixer bowl), add the warm milk, the yeast, and 1 tbsp of sugar. Mix well and let stand for 5-10 minutes until it begins to foam at the top.
  2. Once foamy, add the flour, condensed milk, salt, butter, and the remaining 1 tbsp of sugar.
  3. Turn your mixer on to a low-medium setting and knead for 5 minutes.
    • If mixing by hand, use a silicone spatula to mix all ingredients together.
    • If the dough appears to be too sticky, add about 1 tbsp of flour at a time to help gather it into a ball.
  4. Flour a working area, grab your dough and begin kneading for another 3-5 minutes. Once you feel the dough has a good consistency and is smooth, shape it into a ball and place it in a lightly oiled bowl.
  5. Cover the bowl with a kitchen towel or bowl cover (I use something similar to these).
  6. Let rise for about 1-2 hours until the dough has doubled in size.
  7. Once the dough has rested for about an hour, begin making your filling. Grab your butter and condensed milk and stir in a bowl.
  8. Once the dough has doubled in size, punch the dough down with your hand and being rolling it into a large rectangle.
  9. Now spread your filling mixture over the dough evenly.
  10. Using a knife (or a pizza cutter, which is what I use), cut your dough into 4 sections vertically into 4-5 long strips.
  11. Now stack those strips on top of one another with the filling side facing up.
  12. Cut the stack into about 5-6 sections. Butter or use an oil spray to grease a 9×5 loaf pan, then place the dough into the loaf pan with the long sides facing upwards.
  13. Cover with foil or the same kitchen towel and let rise for an hour.
  14. Bake the bread for 20 minutes, drop the temperature to 300 and bake for another 15-20 minutes.
  15. Take the bread out and let rest for about 30 minutes before attempting to take it out of the pan or pulling apart.
  16. Enjoy!

Note: It is okay if you do not have a loan pan that size. I have used a circular oven pan, and it worked just fine. Also, if you feel there is some empty space in your pan when you first place the dough inside, that is fine. Once the bread rests for another hour, it will rise and double in size, so do not worry! Make sure you watch the bread after lowering the temperature, so it does not brown too much. It should be the perfect golden brown you are looking for.

Did you try this recipe? Rate it below and leave a comment. I’d love to hear your feedback.

View Posts

Go back

Your message has been sent

Rating

Warning
Warning.

Savory Waffle

YUM

When everyone thinks of waffles, they usually think of the sweet dessert-like treat, but waffles can quickly and easily be turned into something quite savory & that is how this recipe came about. As you may know, anything with bacon is much better, so when I began experimenting with making these, I started by adding items already in my pantry that would make a yummy meal. Onions are always incorporated into our cooking, so I added them with some corn since everyone enjoys my corn fritters. As for the cheese, well, cheese is a must. I have to admit, I wasn’t quite sure how these would turn out, but the mixture of savory ingredients with the sweetness of the syrup was a true blend of magic. To be honest, breakfast has never been my favorite meal of the day, but with these waffles, I’ve managed to figure out how to make it much more enjoyable. Now let’s get to the good part of how to make them!

Ingredients

  • 1/2 red onion, diced
  • 1 cup all-purpose flour
  • 6 slices of bacon, chopped (or more if you want to have some of the sides or crumble on top of the waffle-like I did)
  • a handful of chopped green onion or chives
  • 2/3 cup milk
  • 1 egg, beaten
  • 1 cup canned corn, drained
  • 1 tsp baking powder
  • 1 tsp garlic powder
  • 1 tsp cayenne pepper (feel free to add more if you like an extra kick)
  • 1 tbsp vegetable oil (if you have canola oil, that will work too)
  • 1/2 cup cheese of preference (I used mozzarella)
  • salt and pepper, to taste
  • syrup of choice for serving

Instructions

  1. Heat a skillet to medium heat and add the bacon.
  2. Once the bacon has cooked for roughly 3 minutes, add your onions and continue to cook until translucent.
  3. While this is cooking, grab a bowl and mix the flour, baking powder, salt & pepper.
  4. Add the milk, egg, green onion, and oil and mix well.
  5. Once your bacon and onion mixture is cooked, add to the bowl the rest of the ingredients and stir in your cheese. Remember to reserve some bacon if you want to use some as a crumble on top of your waffle.
  6. Mix well until everything is well incorporated. You will have a thick mixture. If you feel it is too thick, feel free to add a little more milk. If you feel it is too watery, add some flour.
  7. Now, heat up your waffle maker.
  8. Once heated, add some of the mixture to the waffle maker.
  9. Cook for about 3-4 minutes (ours has an automatic timer that lets us know once the waffle is ready).
  10. Repeat with the remaining batter.
  11. Once all your batter is finished and you have made the waffles feel free to sprinkle with extra bacon bits if you reserved any.
  12. Drizzle your syrup of choice.
  13. Enjoy!

Note: If you do not have a waffle maker, feel free to make savory pancakes. Just pour the batter and cook for about 4 minutes on each side. Also, if you do not have red onion, you can substitute it for yellow or white. I’ve used all types in this recipe, and it tastes just as great. This batter makes about two large waffles, big enough to share.

Did you try this recipe? Rate it below and leave a comment. I’d love to hear your feedback.

View Posts

Go back

Your message has been sent

Rating

Warning
Warning.

Osso Buco

If you have never tried Osso Buco, you are missing out! The term Osso Buco basically means “hollowed bone,” and when you order your shank, you’ll see that it does indeed have a round, marrow-filled bone right in the center of the cut. I have replaced the traditional veal shanks for this Osso Bucco dish and used beef shanks for this recipe. I also believe that beef is much richer in flavor, so it is my go-to for Osso Bucco. This pairs nicely with pasta, risotto, rice, or polenta (find my parmesan polenta recipe here). The sauce makes the dish, adding so much flavor to your rice or pasta when you pour it over your plate. Although this dish requires a couple of hours of cooking time, the end result is worth it, and the ingredients are easy to find. 

salt & pepper

Ingredients

  • 2-3 lbs beef shanks
  • 2 tbsp olive oil
  • 4 tbsp butter
  • 1 onion (white or yellow), diced
  • 3 tbsp minced garlic
  • 3 carrots, chopped into approximately 1″ pieces
  • 3 stalks of celery, chopped into approximately 1″ pieces
  • 1 cup white wine, try to use a Sauvignon Blanc or Pinot Grigio
  • 1/2 cup of beef stock
  • 1 can of diced tomato, like this one
  • 2 sprigs of fresh rosemary (1 tsp dry)
  • 2 sprigs of thyme (1 tsp dry)
  • 1 bay leaf
  • salt and pepper, to taste

Instructions

  1. Sprinkle salt & pepper on the beef shanks.
  2. Preheat your oven to 300 degrees.
  3. Using a dutch oven or oven-safe large pan, set to medium-high heat, and add olive oil.
  4. Add the beef shanks, and fry for about 2 minutes on each side until they brown a bit.
  5. Remove the shanks and set them aside on a plate.
  6. Add butter to the pan.
  7. Once the butter has begun to melt, add the onions to the pan and cook for approximately 5 minutes until they become a bit translucent.
  8. Add the garlic and cook for an additional minute.
  9. Now, add the carrot and celery and cook for another 5 minutes.
  10. Once the 5 minutes have passed, add in your wine to deglaze the pan.
  11. Then, add in your stock, canned tomatoes, rosemary, and thyme.
  12. Give everything a big stir, and then add back your beef shanks.
  13. Cover and place in the oven for 2-3 hours.
  14. Enjoy!

Note: If you do not want to use wine for this recipe, just substitute the wine with broth. If you are shorter on time, I have also set the oven to 350 degrees and cooked for 1 1/2 – 2 hours instead. Just check on the meat to see if it’s falling off the bone. Also, some like to dust the meat with flour before browning; however, I chose not to do this as a low-carb option.

Did you try this recipe? Rate it below and leave a comment. I’d love to hear your feedback.

View Posts

Go back

Your message has been sent

Rating

Warning
Warning.

Wahoo Smoked Fish Dip

Perfect scoop!

So, my first encounter with any fish dip was while on a trip in Georgia at a restaurant called Julep Kitchen, where they served smoked trout dip. To my surprise, it was delicious, and I’ve continued trying different fish dips whenever I get a chance. Anyway, on our trip to the Florida Keys this year for the holidays, I came across a variety of fish dips, and I started seeing which smoked fish I liked best. I immediately fell in love with wahoo fish dip, and wherever I went that they served it, I ordered it. I quickly realized that I needed to find a way to create our very own fish dip… OR we would be taking A LOT of trips down to the Keys (I wouldn’t complain, lol). Thankfully, at our local Publix, we can order certain types of fish, and within a couple of days, it’ll arrive. My mom, a seafood specialist at Publix, is the real MVP here because she usually orders us some wahoo and even removes the skin and bones so we wouldn’t have to (Thanks, Ma!). Also, if you don’t want to smoke the fish yourself, you can always ask for smoked fish in the seafood department. Some supermarkets have fish already smoked and ready for purchase. For this recipe, you need very basic ingredients which you either have on hand or can easily find at the supermarket. If you are smoking the fish yourself, this is the longest portion of the recipe; otherwise, the rest is just chopping and mixing the rest of the ingredients. I really hope you enjoy this recipe as much as my family did!

Wahoo right out of the smoker. Placed it on racks to cool.

Ingredients

  • 1 lb of wahoo, skin, and bones removed
  • 1/2 cup celery, finely minced
  • 1/2 cup white onion, finely minced
  • juice of 1 lemon & zest
  • 1/2 tbsp of hot sauce, we use Tabasco
  • 1 tsp Worcestershire sauce
  • 1 tsp Old Bay seasoning
  • 4 oz cream cheese, room temperature
  • 1 tsp of paprika
  • 1/2 cup sour cream
  • 1 tbsp of mayo
  • salt and pepper, to taste
  • dip crackers of choice

Instructions

  1. Prep your smoker and set it at a temperature of 200 degrees.
  2. Once it reaches 200 degrees, add the wahoo and smoke for 2-2 1/2 hours. The fish is done when it has a pinkish/tan color and easily breaks into flakes. (You should shoot for an internal temperature of 140 degrees).
  3. Set aside to cool.
  4. Grab your cream cheese, mayo, and sour cream and mix them in a bowl.
  5. Using a food processor, pulse the onion and the celery until they are finely chopped. Add to a large mixing bowl.
  6. Now add the smoked fish to the food processor and pulse until the fish is chopped and broken up (you can leave it more chunky depending on your preference). Now, add the fish to the large mixing bowl.
  7. Add the hot sauce, lemon zest and juice, paprika, Worcestershire sauce, salt, pepper, and Old Bay Seasoning to the bowl and mix with a rubber spatula.
  8. Lastly, add the cream cheese, mayo, and sour cream mixture to the bowl and mix well until it is well combined.
  9. Chill in the fridge for at least 1 hour.
  10. Serve with your favorite crackers or on some toasted bread.
  11. Enjoy!

Note: You can also use yellowfin or ahi tuna, mahi mahi, or red snapper for this recipe. Feel free to serve this with additional hot sauce and lemon; it all depends on your preference of heat and zest. If you can wait longer than an hour to eat this, I would recommend overnight; it will really allow for the flavors to marry.

Did you try this recipe? Rate it below and leave a comment. I’d love to hear your feedback.

View Posts

Go back

Your message has been sent

Rating

Warning
Warning.

Eggnog π

Perfect slice!

Around the holidays, eggnog is a must at our house. We wait until our local farm stores has it in stock and love grabbing a couple of half gallons to get us in the holiday spirit. My family and I love drinking eggnog and wrapping presents; it’s a tradition. This recipe is so easy to make (almost too easy) and requires absolutely no baking (yes, you read that right)! All you need is 5 ingredients, and you’re ready to go. The best part about this is that you can make it ahead of time and serve later. Have leftovers? Feel free to freeze it for up to 5 days. I am amazed at how this simple pie turns out so creamy and airy. This will definitely be added to our holiday dinner menu because it was a hit this year!

Ingredients

  • 1 graham cracker pie crust (9 inch)
  • 1 package of instant vanilla jello (3.4 oz package)
  • 1 1/2 cups of eggnog (we usually buy the Farm Store brand)
  • 1/2 tsp of ground nutmeg
  • 1 container of Cool Whip

Instructions

  1. Grab a large bowl and add the instant pudding to it and in your eggnog. Mix for roughly 3 minutes. You will notice the mixture will begin to thicken. If you have a mixer, this will make it much easier.
  2. Add in the nutmeg and mix.
  3. Now gently fold 1 cup Cool Whip into the mixture.
  4. Pour evenly onto your pie crust.
  5. Refrigerate for at least 2 hours until you feel it has set and is firm.
  6. Top with additional Cool Whip if desired and dust with nutmeg before serving.
  7. Enjoy!

Note: Feel free to make this pie ahead of time and just refrigerate it until ready to serve. If you want to speed up the setting process, feel free to pop it in the freezer for an hour before serving. Also, I use a premade pie crust, but by all means, feel free to make your own if you’d like.

Did you try this recipe? Rate it below and leave a comment. I’d love to hear your feedback.

View Posts

Go back

Your message has been sent

Rating

Warning
Warning.

Honey Butter Biscuits

Okay, who doesn’t love a good biscuit? What is even better is a biscuit with CHEESE. Anyway, when I was little, my brother and I would eat biscuits, and we would love to pour honey in them. So for this recipe, I decided to top these biscuits with some honey for that hint of sweetness. Also, I decided to incorporate cheese in the recipe because I just love cheese. I recently served these at our Halloween party, and they were a hit. I named them “Boo-Biscuits,” but for the sake of this post, let’s refer to them as Honey Cheddar Biscuits. This recipe takes very little time to prepare and requires only a couple of minutes in the oven. The great thing as well is that there is no need to knead or roll your dough. You just stir everything together and into the oven! I like to make these on weekend mornings and eat them with eggs, but I’ve also used them for dinner or BBQs. I hope you enjoy them as much as we do!

Left: Dough, Right: Before placing in the oven with toppping.
Boo Biscuits

Ingredients

  • 2 cups all purpose flour
  • 1 cup buttermilk
  • 1/2 cup unsalted butter (1 whole stick), melted
  • 1 tbsp garlic powder
  • 1 tbsp paprika
  • 1 tbsp sugar
  • 1 tbsp baking powder
  • 1/2 salt
  • 1 cup of cheddar cheese, shredded. You can use 1 1/2 cups for extra cheesiness
    • Topping
      • 1 tbsp parsley
      • 2 tbsp melted butter
      • 1 tbsp honey

Instructions

  1. Preheat your oven to 450 degrees.
  2. Grab your baking sheet and line it with parchment paper or aluminum foil.
  3. In a bowl, combine your flour, garlic powder, paprika, sugar, and baking powder.
  4. Using another bowl, combine your buttermilk and butter.
  5. Now, begin incorporating your dry ingredients into your wet ingredients. Most people would like to use a mixer for this step, but I find using my hands to mix works best.
  6. Once that is well mixed, pour in the cheese and mix well with your hands. Do not use a mixture for this step. Gently fold the cheese in.
  7. Now scoop up the batter evenly with your hands to make a ball. I would use an ice cream scooper to measure these. When placing on the baking sheet, press down lightly so they are a bit flat.
  8. Once all the biscuits are on the baking sheet, use a brush to add the topping to each biscuit.
  9. Bake for 12-15 minutes. You will notice the top will begin to turn golden brown.
  10. Enjoy!

Note: It is important to let these rest for about 5-7 minutes before serving. They might be a bit soft when they come out, so allowing them to set a bit will be key. Also, if you want to make the batter ahead of time, you can. Simply put it in the refrigerator for a couple of hours before needing to bake. Just make sure to saran wrap it.

These Biscuits are even Pandy approved!

Did you try this recipe? Rate it below and leave a comment. I’d love to hear your feedback.

View Posts

Go back

Your message has been sent

Rating

Warning
Warning.

DIY Halloween Candles

As you may know, I can never have enough Halloween, so that’s why this year, we decided to take on a couple of DIYs to create some Halloween magic together. I was amazed at how easy this was to make and how cool it turned out. I used this candle arrangement for our dining table and Halloween dinner, and people were shocked that it was made out of pool noodles! The cool thing about this DIY is that you can get creative with it depending on what items you have available at home. Also, if you don’t have most of these items available, they are most likely found at your nearest dollar store (WIN). Keep in mind, any piece of material can be used as the base for the candle arrangement, so no need to worry if all you have is a piece of cardboard; it’ll work!

A couple of pool noodles, scissors, black spray paint, glue gun, plastic tea light candles, extra Halloween accessories.
After gluing your candles to the bottom of a tray and together at desired lengths, start using your glue gun to create the candle drips.
Now time to paint them black!
Candles spray painted black and glued to the base and each other.
Showing that you may have to enlarge the noodle hole to make sure the candle fits.

Materials

  • 3-4 pool noodles. This all depends on how many candles you want.
  • Scissors
  • Glue gun and glue.
  • Black spray paint
  • 1 pack of moss
  • A couple of your favorite flowers. We picked some up from our local Dollar Tree.
  • 1 pack of battery-powered plastic tea light candles. We used these. I would suggest buying the remote control ones as we did because if you have to take them out to turn them off everyday… good luck to you.
  • extra accessories you may have for Halloween you want to add (i.e., spider, crows, snake).

Building Instructions

  1. Grab your pool noodles, and using your scissors, cut them to your desired length.
  2. Take your glue gun and begin creating the candle drip on each foam noodle.
  3. Once the drip dries, it’s time to spray paint your noodles black.
  4. Once the noodles are dry, use your glue gun to glue them to the bottom of your tray with your desired arrangement style. We used a black plastic tray we had from previous years.
  5. Now that they are glued on the bottom, using your glue gun, glue them to each other.
  6. To insert the tea lights, you may have to use your scissors to make the insert larger. Once it’s big enough, insert the tea light. Make sure they are switched to ON before inserting them into the noodles to avoid having to take them out to turn them on.
  7. Add moss at the base of your tray and around the noodles. We glued some of it to make sure it doesn’t move.
  8. Glue any accessories and flowers you may want to add to the arrangement.
  9. Voila, enjoy!

Note: I spray painted some small spiders and a rubber snake gold and added it to the bottom of my candle arrangement. This is optional, obviously, but feel free to get creative with anything you may have laying around the house that you aren’t using. You also do not have to glue the noodles to a tray. You can just stack them around the table and use maybe moss to hide the bottom. I just felt gluing them to a tray and together will help keep them up.

Remember to tag me on IG so that I can feature you on my page!

Did you try this DIY? Rate it below and leave a comment. I’d love to hear your feedback.

View Posts

Go back

Your message has been sent

Rating

Warning
Warning.

Skull Tower

I placed this right by the window in our entryway, and it really completed the space.

If there is one thing everyone knows about me, it’s that I LOVE HALLOWEEN. It is my favorite holiday (sorry Christmas you’re second) and when August is nearing its end, Adam already knows it’s time to head to the attic because it’s Halloween time (thanks, boo)! Now I don’t NEED any more dĆ©cor (said no woman ever), BUT I love DIYs, and we love creating something fun. I believe this skull tower cost me $15 (at most) total and was so easy to build. I found all items at the dollar store, which was great, and I need to thank my Dil pickle for climbing the isle for the skull heads (LOL). The only other items I used were the glue gun I already had and the pot I used. For this, you can use a regular outdoor pot like this one, but I decided to use a tree stand we had in the garage.

I grabbed most of these materials at my nearby Dollar Tree.
Holes at the top and bottom of skull head.
This is a look at the building process. Pandora is in the background supervising. obvs.
Here you can see us sliding the broomstick through the skull head.
Here is a better shot of the skull going through the stick. As you can tell from this video, the holes we created weren’t perfect!

Materials

  • skulls found at the dollar store (it depends on how tall you want your tower, I used 10).
  • Skull hands if you want to incorporate them instead of just having heads (again, amount counts on how tall your tower will be)
  • 1 broomstick, just the stick (plastic or wood)
  • Foam balls (Large)
  • outdoor pot of your choice
  • a couple of bags of moss (found at the dollar store as well)
  • Glue gun
  • Glue
  • Scissors
  • extra accessories you may have for Halloween you want to add (i.e., spider, crows, snake)

Building Instructions

  1. Grab your pot and glue a large foam ball to the bottom of it.
  2. Grab the rest of your foam and use it as filler foam around the ball to ensure it is not too shaky.
  3. Take your broomstick and poke it through the middle of your foam ball
  4. Grab your skull heads and hands (if using hands) and cut holes on the bottom and top of them (it doesn’t have to be perfect at ALL). Make sure you don’t do each skull or hand hole on the same spot. This way, it will create a different look sitting on the tower.
  5. Once you have stacked the heads or hands to the top, grab your moss and begin gluing it between the skull parts and the broomstick to cover any gaps or spaces where you can see the pole or any imperfections. Again, it does not have to be perfect. Some spots can have more moss than others.
  6. Add your extra Halloween accessories such as a crow, spider, snake, etc.
  7. Voila, enjoy!

I would buy some extra skulls just in case when beginning to make holes, some might get damaged. Also, I’ve seen others use dowels instead of a broomstick, so that might be an option as well. If you want to change it up a bit, you can also spray paint the skulls! I did this for a few I had inside the home, and it was easy peasy! Most importantly, have fun with it!

Remember to tag me on IG so that I can feature you on my page!

Did you try this DIY? Rate it below and leave a comment. I’d love to hear your feedback.

View Posts

Go back

Your message has been sent

Rating

Warning
Warning.